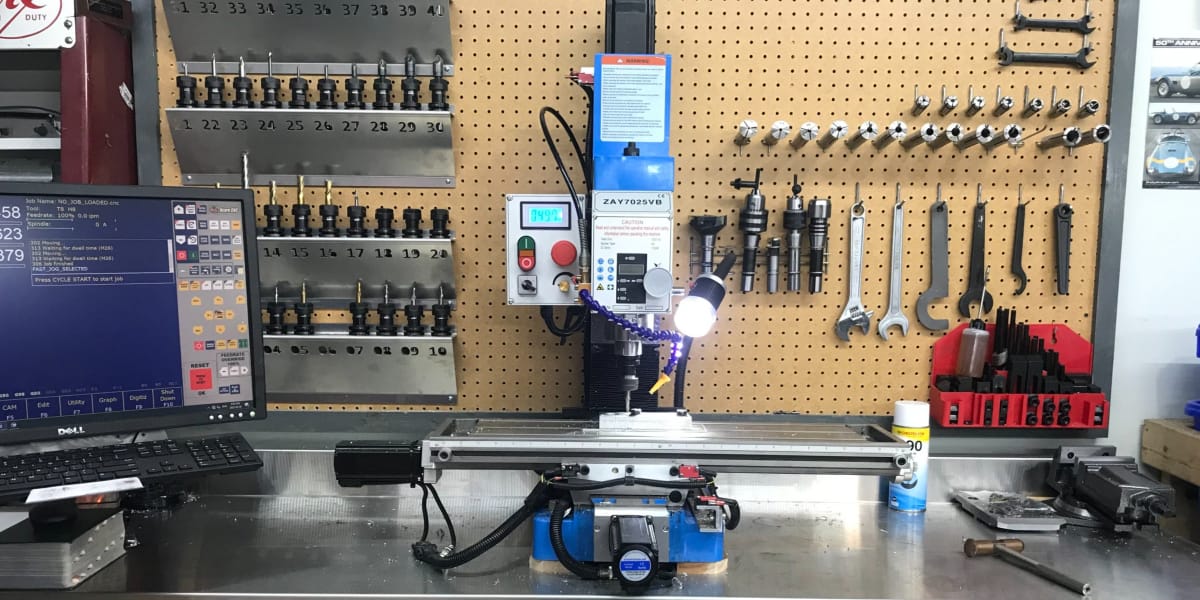
Awesome Centroid CNC Conversion of PM-25MV clone ZAY7025VB.
In this write up we will go through our conversion to Centroid CNC conversion of a WMTCNC ZAY7025VB Benchtop milling machine. On the net you will see Centroid PM-25MV CNC conversions all over the place. The mill ZAY7025VB, which is a clone of the Precision Matthews PM-25MV can be had for 2/3 the price of the PM-25MV and we are positive it is made by the same factory. It has a 1hp DC, variable speed belt drive motor and weighs a hefty 275lbs which is fairly robust for a small benchtop mill, appears very well built for the price.
There are many different sizes of Bench Mill out today that are all convertible to CNC, you just need to decide what size best suits your needs and what footprint you have available to operate the machine. In our case, the ZAY7025VB fit our bill based on its operating footprint and the amount of room we had to spare where it was going to sit.
The Machine
When picking a machine, you need to pay close attention to what you are getting for features, we will cover this in greater depth in a later article. The main point that helped us pick this machine is the rectangular non tilting column, do not buy a tilt column as you will regret it, not rigid enough for CNC usage.
Once you have a machine, you will need to decide on what ball screws or conversion kit you are going to use. In our case, the physical conversion of the machine was done by using Heavy Metal CNC conversion for the Precision Matthews. The install is simple, follow the included instructions and you are good to go. We will not get into the install of the kit as there is a thorough instruction document that comes with the kit.

The CNC Controller
Now we are on to the control side of the machine, select the CNC motion controller first in our opinion and build out from there. In our case we went with the Centroid Acorn Motion Controller. We have heard nothing but positive comments about their controller and their program CNC12. Centroid has been doing CNC since 1979 and they build amazing stuff.
https://centroidcnc.com/centroid_diy/acorn_cnc_controller.html
Centroid Acorn kit comes with the Centroid Acorn motion controller, a 24V power supply and a relay control board to be able to run auxiliary equipment all for $299. The included software program is CNC12 which allows a 50kb G Code file size. Acorn Mill Pro CNC software is an additional $159, just buy this when you get the Acorn, save yourself time as you will end up doing it later anyway. Once you begin using Acorn, you will see this combo is a great deal, do it, trust us.
The Tool holders
The Acorn Mill Pro allows you to have a huge tool library with pre-set tools. We have used Tormach TTS style holders to have all of our tools in holders ready to go with heights pre-set and setup in the Acorn Pro Mill tool library, very efficient and eliminates a bit of complication from an already complicated project. We also had holders built that you can see in the left of the header picture to store the tools and keep the library organized.

The Steppers and Drivers
The next step was to decide on drivers, power supplies and steppers. After researching many different companies’ offerings, we went to StepperOnline.com. When you do a conversion do not buy a stepper motor, buy a hybrid stepper or if price is not an issue, buy servo motors. With a hybrid stepper, they have a built-in encoder that keeps track of how many steps the motor has made where a regular stepper does not. This is important in not losing steps, which will wreck your part you are making. We decided to try the following from stepper online.
For the X and Y axis we used one of these CLTS40 kits from StepperOnline.com for each X and Y
This CNC kit includes:
- Nema 24 Closed Loop Stepper Motor 4.0Nm/566.56oz.in Encoder 1000CPR – Qty 1
- Closed Loop CL57T Stepper Driver 0-8.0A 24-48VDC for Nema 24 Stepper Motor – Qty 1
- 250W 48V 5.0A 115/230V Switching Power Supply Stepper Motor CNC Router Kits – Qty 1
- 1.7 m(67″) Long Encoder Extension Cable for Closed Loop Stepper Driver – Qty 1
- AWG20 1.7 m(67″) Long Motor Extension Cable with GX16 Aviation Plug – Qty 1
For the Z axis we used one of these CLTS90 kits from StepperOnline.com
This CNC kit includes:
- Nema 34 Closed Loop Stepper Motor 9.0Nm/1274.76oz.in with Encoder 1000CPR – Qty 1
- Closed Loop CL86T Stepper Driver 0~8.2A 24~80VDC for Nema 34 Stepper Motor – Qty 1
- 350W 60V 5.9A 115/230V Switching Power Supply Stepper Motor CNC Router Kits – Qty 1
- 1.7 m(67″) Long Encoder Extension Cable for Closed Loop Stepper Driver – Qty 1
- AWG18 1.7 m(67″) Long Motor Extension Cable with GX16 Aviation Plug – Qty 1

For connecting these drivers to the Acorn board, you will need a DB25 breakout board, we used this one. The reason for this is that this model of driver runs off a 5V signal, not a 24V.
- YIOVVOM DB25 Breakout Board Solder-Free Male Adapter 25-pin Port Adapter to Terminal Connector Signal Module Long Bolts and Nuts with case. We took the case off and just installed the board inside the enclosure.

Microswitches
Another item on the list you will need to procure are microswitches to be able to set up your home position. In our case we selected these switches from Amazon, they come in a 6 pack and made brackets to suit for our machine. This was one of the easiest parts of the build yet one of the most critical.

Bench testing
Once you get the components, follow Centroid’s instructions on bench testing. You start with just the Acorn to prove it communicates with your PC. Next you power down, add a component, test, power down, add another, test. Follow their instructions exactly, don’t cut corners. With the CL57T and CL86T driver there is an error in the instructions. To correct this, go into CNC12 setup and change the steps per revolution to 100,000 from the default 200,000. If you do not, the drives may or may not work, with 100,000 they do work.
Building an enclosure
The next step was we needed an enclosure to put the controls in, there are many ways to do this. Seeing as our PC to run the CNC was a Dell Precision that we picked up used for a great price, we figured why not find another case like that. The next day, one showed up on marketplace with a bad motherboard and we were set.
The donor computer was completely disassembled, and all the interior components were removed as well as all of the bracketry. We modified the case as shown in the pictures, removing the stuff that wasn’t needed. We then installed a 1/8” aluminum plate in the case to use as a mounting panel.

Installing the controls
With the case ready, the components were mocked up and laid out to determine best locations. The holes were marked, and all components were removed, bagged and set aside for protection from drillings. You must be careful with this step which could potentially short something out if drillings got inside an electrical component. Once the mounting panel was drilled and tapped, the components were installed so the wiring could begin. When wiring the drivers to the acorn make sure to use shielded wire, this is very important. It’s up to you whether you use premade or know how to make shielded wire.
Time for testing
Now that this is done and you are wired up, time to connect all the wiring as shown by Centroid. When wiring is complete you must double and triple check you have no errors. Once complete it is time to power up as per directions for another bench test! Once that proves out and you are victorious, it is time to mount the motors to the machine.

Time to power up again, it is time to run through the range of motion. Doing this, you must ensure it does not bind and travels the full range. Now that you have confirmed this is good to go, follow Centroid’s document to do machine program set up. Another great resource is to and look at their YouTube channel, they have an amazing amount of information available.

Happy learning and good luck on your projects!